As a homeowner or property manager, mastering the art of stopping a water leak is a crucial skill that can empower you to save time, money, and stress. If not addressed promptly, water leaks waste a significant amount of water and lead to increased utility bills and potential property damage. By learning how to stop them, you can take control of your expenses and protect your property.
This guide is designed to empower you with the knowledge of how to stop a water leak, detect the signs of hidden leaks, and take proactive steps to prevent costly property damage. By being vigilant and acting early, you can prevent leaks from escalating into major problems, demonstrating your responsibility as a homeowner or property manager.
Why Stopping Water Leaks Quickly Is Essential
If left unaddressed, water leaks can escalate into major problems, including structural damage, mold growth, and skyrocketing utility bills. Beyond these financial and health risks, water leaks contribute to unnecessary water wastage, a growing concern for environmental conservation.
Taking swift action to stop water leaks ensures:
- Reduced utility bills
- Prevention of property damage
- Conservation of water resources
How Leaks Impact Your Utility Bills
A dripping faucet or a leaking pipe might seem minor, but even small leaks can waste hundreds of gallons of water monthly. This leads to increased water consumption and hikes in your utility bills.
Fixing leaks promptly can:
- Decrease water usage by up to 10%
- Prevent unexpected spikes in your water bill

Common Signs of a Water Leak
Awareness of the signs of a water leak can help you act quickly. Some common indicators include:
- Unexplained spikes in your water bill
- Wet spots on floors, walls, or ceilings
- Musty odors or visible mold growth
- The sound of running water when no fixtures are in use
If you notice these signs, it’s time to investigate further.
How To Identify The Source Of a Water Leak
Identifying the source of a water leak can be challenging, especially if it’s not immediately visible. However, with some guidance and a few tips, it’s possible to locate the leak and take the necessary steps to fix it.
Here are some step-by-step instructions for identifying the source of a water leak:
Step 1: Check Visible Pipes and Connections
Check exposed pipes and connections for moisture, corrosion, or damage. Pay attention to:
- Loose fittings
- Cracked pipes
- Damaged seals
Step 2: Use a Water Leak Detector
A water leak detector is a handy tool for finding hidden leaks. These devices detect moisture levels and alert you to potential issues. Consider investing in a smart water leak detector for real-time monitoring.
Step 3: Check Other Common Leak Locations
Some areas are more prone to leaks than others. Inspect these spots:
- Under sinks: Look for moisture or water pooling near connections.
- Toilets: Check the tank, bowl, and supply line for leaks or water stains.
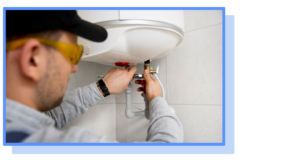
- Water heaters: Inspect for moisture around the tank or hissing sounds indicating a leak.
Detecting Hidden Leaks
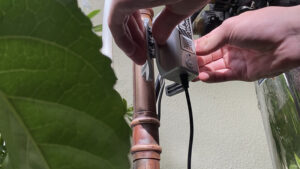
How a bluebot Smart Water Meter Can Help
A high water bill with no visible leak is the worst. But the reality is that these types of leaks can pop up from time to time.
Hidden leaks can be particularly tricky. Here are some tips to identify them:
Monitor Your Water Meter
Turn off all water appliances and check your water meter. If it continues to move, there’s likely a leak.
Watch for Water Pressure Changes
A sudden drop in water pressure can indicate a hidden leak. Investigate pipes, fittings, and common leak points.

If you’re a homeowner or property manager, you know how important it is to promptly detect and address water leaks. One tool that can help you do this is the bluebot smart water meter.
Below, we listed some ways that our smart meter can help detect leaks before they lead to costly consequences:
Real-Time Monitoring and Alerts
The bluebot smart water meter provides real-time monitoring of your water usage, allowing you to detect leaks as soon as they occur. The device sends alerts to your smartphone or email if it detects an unusual increase in your water usage, indicating a potential leak.
This early warning system can help you quickly address leaks and prevent costly property damage.
Historical Usage Data
In addition to real-time monitoring, the bluebot smart water meter also provides historical usage data. This data can help you track your water usage over time and identify patterns that may indicate a leak.
Reviewing your usage data regularly lets you detect leaks before they become major issues.
Easily Clamps on to 60+ Different Pipe Types/Sizes
The bluebot smart water meter is designed to be easy to install and can be clamped onto over 60 different pipe types and sizes. This means that you can easily add the device to your existing plumbing system without requiring major renovations or plumbing work.
DIY Fixes for Common Leaks
Dealing with household leaks can be frustrating, but many leaks can be easily fixed with a few simple tools and some basic knowledge. Here are some common household leaks and their simple fixes:
Replacing a Washer
A leaking faucet is a common problem that can be caused by a worn-out washer. Here’s how to fix it:
How to Identify a Leaking Faucet
If you notice water dripping from your faucet, it’s likely that the washer needs to be replaced. You may also hear a constant drip or see water stains around the base of the faucet.
Tools Required
Adjustable wrench, screwdriver, pliers, replacement washer.
Step-by-Step Instructions
1. Turn off the water supply to the faucet.
2. Unscrew the handle of the faucet and remove it.
3. Use pliers to unscrew the packing nut.
4. Remove the stem from the faucet.
5. Use a screwdriver to remove the washer from the stem.
6. Replace the old washer with a new one.
7. Reassemble the faucet and turn on the water supply.
Adjusting a Valve
A leaking valve can be caused by a loose or worn-out valve stem. Here’s how to fix it:
How to Identify a Leaking Valve
If you notice water dripping from the valve stem or valve handle, it’s likely that the valve needs to be adjusted.
Tools Required
Adjustable wrench, pliers.
Step-by-Step Instructions
1. Turn off the water supply to the valve.
2. Use an adjustable wrench to loosen the packing nut.
3. Tighten the valve stem with pliers.
4. Re-tighten the packing nut.
Tightening a Connection
A loose connection can cause water to leak from pipes, hoses, or other plumbing fixtures. Here’s how to fix it:
How to Identify a Loose Connection
If you notice water seeping from the joint or connection, it’s likely that the connection needs to be tightened.
Tools Required
Adjustable wrench, pliers.
Step-by-Step Instructions
1. Turn off the water supply to the affected area.
2. Use an adjustable wrench to tighten the connection.
3. Turn on the water supply to check for leaks.
Tips and Tricks for Successful DIY Repairs
Preparing the area before starting, cleaning the parts before reassembling, and testing the repair for leaks are important steps for successful DIY repairs. By following these simple tips, you can ensure that your repairs are effective and long-lasting.
Preparing the Area Before Starting
Before you begin any repairs, turning off the water supply to the affected area is important. This will prevent water from leaking out while you work and reduce the risk of damage to your property.
Cleaning the Parts Before Reassembling
Before you reassemble the plumbing fixture, it’s important to clean all of the parts thoroughly. This will help ensure that the connections are tight and the fixture is leak-free.
Testing the Repair for Leaks
After you’ve completed the repair, turn on the water supply and check for leaks. If you notice any leaks, you may need to tighten the connections or replace any worn-out parts.
When to Call a Professional
As a homeowner or property manager, you may be able to handle some small-scale water leaks on your own. However, there are certain situations where it’s best to call a professional plumber to handle the repair.
Here’s when you should consider calling in the experts.
If you have identified a water leak but are unsure about how to proceed with the repair, it’s always better to call in a professional plumber. A licensed and insured plumber can help you identify the root cause of the leak and recommend the best course of action to fix it.
Types of Leaks That Require Professional Repair
Some types of leaks require specialized expertise and equipment to repair. These include:
- leaks in the main water line
- sewer line leaks
- leaks in underground pipes
These types of leaks are not only difficult to locate, but also require special tools and equipment to fix. A professional plumber has the knowledge and expertise needed to handle these types of repairs.
The Importance of Hiring a Licensed and Insured Plumber
When hiring a plumber to repair a water leak, it’s important to choose a licensed and insured professional. A licensed plumber has the necessary training and expertise to handle plumbing repairs safely and effectively. An insured plumber, on the other hand, will protect you from liability if any damage occurs during the repair process.
Regular Monitoring
Regular monitoring of your water usage is essential to ensure that you catch any leaks or unexpected spikes in usage as soon as possible.
For example, say you get an unusually high water bill one month. You’re regularly monitoring your water usage, and you know you haven’t done anything out of the ordinary.
So you figure it could be coming a leaking pipe. You check your pipes and discover a small leak near the washing machine. Problem identified.
Because you’re regularly monitoring, you were able to find the leaking pipe and prevent further water damage and an even bigger water bill.
So how often should you monitoring your water usage?
Depending on your needs, you can check your water meter daily, weekly, or monthly to ensure that your water usage is on track.
One way to put your water monitoring on autopilot is by using a smart water meter like bluebot.
With real-time monitoring and alerts, historical usage data, and the ability to clamp onto 35 different pipe types and sizes, bluebot makes it easy to monitor your water usage and prevent future leaks.
If you’re interested in learning more about bluebot and how it can help you monitor your water usage, check out our shop page for more information.
Conclusion
In conclusion, identifying and fixing water leaks is essential for homeowners and property managers. It helps reduce water waste, save money on utility bills, and prevent costly damage to the property.
Remember to check for common signs of a water leak and take action promptly to fix any issues, which include:
- a sudden increase in your water bill
- wet or damp spots on floors or walls
- musty or moldy odors
- the sound of constantly running water
Once you’ve identified the leak, you may be able to fix it yourself by:
- Replacing a washer
- Adjusting a valve
- Tightening a connection
Or if you can’t figure it out on your own, you can always call a professional for help.
But most importantly, if you want to monitor you water usage and water leaks on autopilot, the bluebot smart water meter is the solution for you – you’ll get real-time monitoring and alerts, historical usage data, and easy installation.
And best of all, you’ll prevent future water leaks and save money on utility bills.
(Plus … you’ll never have to look up ‘how to stop a water leak’ again.)
Lorem ipsum dolor sit amet, consectetur adipiscing elit. Ut elit tellus, luctus nec ullamcorper mattis, pulvinar dapibus leo.