

Irrigation leak detection is the diagnostic process of locating water loss inside a sprinkler, drip, or multi-zone watering system before that loss becomes visible. Bluebot clamps onto the outside of the irrigation main or drops straight into the valve box, with no cutting, no shutoff, and no plumber, so the line nobody else can meter is the one you can finally watch. An underground irrigation leak behaves nothing like an indoor plumbing failure. There is no ceiling stain and no puddle on the floor. Water simply drains into soil, week after week, while the meter keeps turning. This guide gives you the warning signs, a five-step field procedure for locating an irrigation leak yourself, current repair costs, and the monitoring setup that closes the gap between when a fault starts and when you find it.
Key facts at a glance
| Time required | 45 to 90 minutes for a full zone-by-zone sweep |
| Skill level | Beginner to intermediate (no excavation required) |
| Cost of one small leak | A leak roughly 1/32 inch across wastes about 6,300 gallons a month, according to EPA WaterSense (2026) |
| Typical professional locate | $150 to $400 per visit |
| Confirmation window | 24 to 48 hours with the system off |
| What you’ll need | Controller access, water meter access, a timer, marking flags |
What Irrigation Leak Detection Actually Finds
Irrigation system leak detection covers the methods used to identify water loss from sprinkler networks, drip irrigation systems, and multi-zone irrigation systems: the whole of your buried irrigation infrastructure. Three failure points account for most of it. Sprinkler heads crack from mower strikes, freeze damage, and simple age. Buried pipes fail where tree roots intrude or where soil settles under a rigid run. Zone valves and their fittings loosen from temperature cycling and vibration inside the valve box.
The reason a hidden irrigation leak survives so long is structural, not mysterious. Most of your system sits below grade: irrigation lines, fittings, and valve assemblies alike. Water escaping a buried pipe leak follows the path of least resistance through surrounding soil and often surfaces nowhere near the break, or never surfaces at all. Irregular watering schedules mask the usage pattern that would expose the same fault in a continuously pressurized indoor line. Rainfall and seasonal swings then blur the one signal most homeowners rely on: the monthly bill.
Drip irrigation differs from spray sprinklers in an important way. A blown spray head is loud and obvious; a split drip line or a failed emitter seeps slowly at ground level under mulch, so the visual cue you’re trained to look for never appears. Microirrigation hides its faults by design. That is exactly why detecting irrigation leaks needs a repeatable procedure rather than a walk-around.
The scale matters. Americans use about 9 billion gallons of water outdoors each day, mostly for landscape irrigation, and the U.S. Environmental Protection Agency’s WaterSense outdoor water use data (2026) estimates as much as 50 percent of it is lost to wind, evaporation, and runoff from inefficient watering methods and systems. A leaking system compounds an already lossy category.
Warning Signs That Point to an Irrigation Leak
Five symptoms reliably precede a confirmed fault. Learning to read them turns irrigation leak diagnosis from guesswork into triage.
- Soggy ground that persists. Standing water or spongy turf still wet long after a cycle finishes signals water accumulating from below.
- Dry patches inside watered zones. The inverse symptom. A blocked or broken pop-up sprinkler head upstream is diverting water before it reaches its coverage area.
- Low water pressure across a zone. Heads that barely rise, mist instead of spray, or produce a weak spray pattern usually mean pressure loss to a break somewhere ahead of them.
- A summer water bill increase with no schedule change. This is the most common trigger for an investigation, and the most commonly ignored.
- Sound and movement. A hiss near a valve box means pressurized escape. A meter that keeps creeping after everything is shut off means something downstream is still flowing.
Causes cluster just as predictably: cracked heads from equipment impact or freezing, damaged underground pipes from root intrusion and soil settlement, loose solenoid valve connections and fittings, components past their service life, and installation shortcuts that create weak points. Freeze-thaw cycling deserves special mention: water expanding inside a pipe over winter cracks components that then fail the moment spring pressure returns.
If your symptoms point squarely at a spray head rather than the network, our companion guide to sprinkler leak detection covers head-level diagnosis and replacement in more depth.
What You Need Before You Start
Gather these before you begin. Nothing here requires a specialist.
- Access to your controller, for single-zone activation
- Access to your water meter, plus the ability to shut off every other fixture
- A watch or phone timer
- Marking flags, marking paint, or golf tees
- A notepad or phone note for meter readings per zone
- Optional: a smart water flow meter installed on the line for continuous monitoring
Two safety notes before the first zone runs. Do not dig near the meter, backflow assembly, or any utility path. Call 811 first. And if a repair would require excavation near a foundation, gas line, or electrical service, stop and hire a professional.
How to Find Irrigation System Leaks, Step by Step
This is the core procedure for finding irrigation leaks on a residential or light-commercial lawn irrigation system. Run the steps in order; each one narrows the search area for the next.
Step 1: Walk the system cold
Before activating anything, walk the entire irrigation network with everything off. Look for standing water, muddy patches, sunken ground, eroded mulch, and any exposed component showing a crack. Open every valve box and look inside. Standing water in a box that hasn’t run recently is one of the strongest single indicators of a leaking valve or a cracked fitting at the manifold. Flag everything you find. You are building a map of suspects, not diagnosing yet.
Step 2: Isolate and test one zone at a time
Use the controller to activate a single zone, then walk that zone’s full coverage area while it runs. Watch each head for irregular spray, misting, geysering, or failure to rise. Watch the ground between heads: water bubbling up mid-run, or a wet line that tracks along the pipe route, points to an underground pipe leak rather than a nozzle. Listen for hissing. Note any zone where pressure looks visibly lower than its neighbors. Then shut it down and repeat everywhere. This zone-by-zone isolation test is the backbone of sprinkler system leak detection because it converts a whole-property problem into a single-zone problem.
Step 3: Run a water meter leak test
Now quantify it. Shut off every water-using fixture in the house. Record your water meter reading. Activate one zone for a measured period (10 to 15 minutes is enough). Record the ending reading and calculate actual consumption, then compare it against what that zone should use based on its head count and nozzle flow rates. A zone consuming meaningfully more than its design flow has a fault inside it. Repeat the meter test per zone and rank them by discrepancy. This step is the one most DIY sprinkler leak detection attempts skip, and it is the one that produces a number instead of an opinion.
Step 4: Confirm underground leaks with a dry-down
Mark every area of excessive moisture, then shut irrigation off completely for 24 to 48 hours. Normal post-irrigation drainage dries within that window. A spot still saturated afterward is almost certainly an active below-grade leak (a subsurface leak fed by system pressure) rather than ordinary drainage. This simple observation test is what separates a real underground sprinkler leak from a low spot that just holds water, and it should always happen before anyone puts a shovel in the ground.
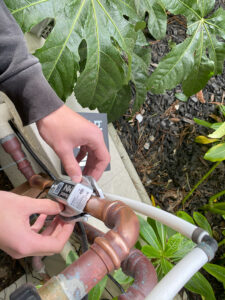
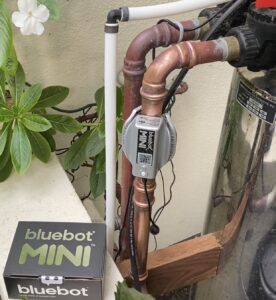
Step 5: Clamp a Bluebot on the line for continuous flow monitoring
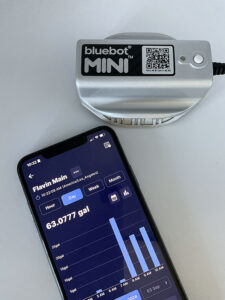
Manual testing gives you a snapshot. A smart water flow meter such as the 100-W (Bluebot Hero) gives you a continuous record, learning each zone’s normal flow and flagging deviations automatically. On the specific criterion of detection latency (how long a fault runs before anyone notices), continuous monitoring outperforms periodic inspection for a structural reason: it samples flow constantly, while a manual walk-through samples it once every few weeks. It does not improve repair quality or pinpoint a break, and it does not replace Steps 1 through 4; it removes the waiting.
A meter on the irrigation line applies that logic continuously. It builds a normal flow profile for the line and raises a real-time alert when flow departs from it: higher than normal points to a leak, lower than normal to a constriction or a valve problem.
What Irrigation Leak Repair Costs in 2026
An undetected leak is expensive precisely because it is undramatic. A fault losing just 1 gallon per minute (barely noticeable while a zone is running) wastes 43,200 gallons over a 30-day month. Depending on your utility’s rates, that typically adds $50 to $200 to a monthly bill, every month, until it’s found.
As of 2026, industry cost surveys from HomeGuide, Angi, and LawnStarter put the repair side at these ranges:
| Line item | Typical 2026 cost | Notes |
|---|---|---|
| Professional locate visit | $150 to $400 | Charged when manual inspection fails to find the source |
| Labor | $50 to $115 per hour | Emergency calls run substantially higher |
| Head or fitting (DIY parts) | $5 to $25 | Within most homeowners’ capability |
| Underground pipe section replacement | $200 to $500 | Varies with depth, access, and materials |
| Annual pre-season inspection | $75 to $150 | Preventive, not corrective |
| Average total repair | About $278 | Angi 2026 cost data; most repairs take two hours or less |
Two categories sit outside those tables. Persistent seepage near a foundation saturates soil and creates hydrostatic pressure against basement walls; sustained over-watering erodes soil and undermines retaining walls, patios, and driveways. Contractors typically quote mold remediation in the range of $2,000 to $6,000 depending on extent, and structural foundation repair from $10,000 to $25,000 in severe cases requiring waterproofing and reinforcement. Treat both as typical estimate ranges rather than fixed prices: neither figure comes from a published industry survey, and both vary enormously by region and severity.
Regulatory cost is real too, and local. Many municipalities impose fines for excessive use during drought restrictions, and some restrict outdoor watering entirely. Restriction rules, penalty schedules, and rate structures vary by jurisdiction. Verify them with your local water district before assuming a fault is only a billing problem. Bluebot exists for the gap between the fault and the discovery: a meter on the irrigation main turns a $200-a-month invisible leak into an alert in week one.
Detection Tools, from Acoustic Sensors to a Bluebot on the Line
Traditional tools. An acoustic sensor picks up the sound of pressurized water escaping a buried pipe, which lets a technician narrow a location without trenching the whole run. Acoustic leak detection works best on larger breaks that generate enough noise, and it can miss a slow-seeping concealed irrigation leak entirely. Pressure gauges identify pressure drops between measurement points, but they require several readings and careful interpretation to isolate a segment. A soil moisture probe measures subsurface moisture and highlights saturated areas, though a moisture sensor can’t distinguish a leak from intentional watering without additional context. All three reward experience, which is part of why professional locates carry the price they do.
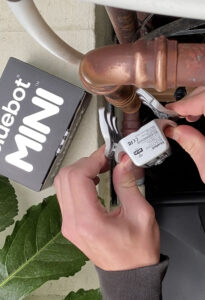
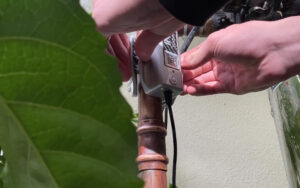
Smart monitoring. The 50-W (Bluebot Mini) clamps directly into the irrigation valve box or onto the branch line, no cutting and no plumber, and is sized for exactly this job: residential irrigation systems, irrigation valve boxes, and branch lines on 3/4-inch and 1-inch pipe. It fits copper, PVC, PEX, and galvanized steel, carries an IP68 environmental rating, and runs on USB-C power from the included adapter, so there is no battery to replace. For larger properties and light-commercial or agricultural irrigation, the Bluebot Hero covers 3/4-inch to 2-inch pipe. Both report to a phone app with alerts when flow deviates from the learned baseline. You can compare sizes at the Bluebot smart water meter shop.
Continuous meters work by establishing a flow signature for each zone during normal operation, then flagging departures from it in either direction: higher flow for leaks, lower flow for blockages. Historical data matters as much as the alert: a zone whose baseline has crept upward over two seasons is telling you about a developing failure long before it becomes a geyser.

How to Prevent the Next Irrigation Leak
Prevention is cheaper than detection, and detection is cheaper than repair.
- Inspect before each season. A pre-season professional inspection at $75 to $150 catches winter damage, worn components, and weak points before pressure returns.
- Handle winterization properly in cold climates. Drain the lines completely and use compressed-air evacuation to clear residual water; freeze damage causes most spring failures. Insulate valve boxes and backflow preventers in exposed locations. A proper blow-out is the single highest-value preventive job of the year.
- Adjust heads seasonally. Landscape growth shifts spray patterns; misdirected spray often signals the alignment problem that precedes a break.
- Replace on service life, not on failure. Sprinkler heads typically last 5 to 10 years, while valves and control systems generally run 10 to 15 years before they need replacing.
- Upgrade the controller. The EPA’s WaterSense controller program (2026) reports that a WaterSense labeled irrigation controller can save an average home up to 15,000 gallons of water annually by not overwatering, which is real money off a summer bill at any utility rate.
- Shorten the discovery window. Prevention does not catch what has already failed. A Bluebot on the irrigation line does: it turns detection from a scheduled chore into a background process, which is what makes catching a slow seep in week one realistic instead of aspirational.
When to Call a Certified Professional
Replacing a cracked head or tightening a loose fitting is well within most homeowners’ range, and the parts run $5 to $25. Call a professional when a fault persists after surface-level repairs, when you’ve confirmed the symptoms but can’t locate the source, or when the fix requires excavation near utilities, a foundation, or hardscaping. Professionals bring detection gear, pressure-testing equipment, and the pattern recognition that keeps digging to a minimum. Expect labor in the ranges above, with complete pipe section replacements running $200 to $500 depending on access and materials.
Credentials are the part most people skip. The EPA’s WaterSense professional certification program (2026) recommends hiring an irrigation professional certified through a WaterSense labeled certification program; the Irrigation Association’s Certified Irrigation Contractor credential is one such nationwide program, and the CIC credential requires continuing education to maintain. Verify licensing for your state or municipality (requirements vary by jurisdiction) and confirm liability insurance before work begins. Ask for written estimates that specify scope, materials, and warranty terms on both parts and labor; reputable contractors typically guarantee this work for at least a year.
The Bottom Line
Irrigation leak troubleshooting is a sequence, not a hunch: walk the system cold, isolate each zone, measure at the meter, confirm with a dry-down, then monitor continuously so the next one surfaces in days instead of seasons. The manual steps find what’s already broken. Continuous flow monitoring is what shortens the window between failure and discovery, and that window is where nearly all of the cost lives: in wasted water, saturated soil, and damage that compounds quietly.
Start with one zone this week. Log the meter reading, run it for 10 to 15 minutes, and see whether the number matches what that zone is supposed to use. That single measurement is often the entire diagnosis, and a Bluebot on the line takes it for you every day after that.
Frequently Asked Questions
How long does irrigation leak detection take from start to finish?
Plan on 45 to 90 minutes of active work for a full zone-by-zone sweep, plus a 24 to 48 hour waiting period if you need the dry-down test to confirm an underground leak. The hands-on portion is short; the confirmation window is what stretches the calendar. Continuous flow monitoring removes the waiting entirely by flagging abnormal zone flow as it happens.
Can you find an irrigation leak without digging up the yard?
Yes. All five steps in this guide are non-destructive: a cold walk-through, zone-by-zone isolation, a water meter leak test, and a 24 to 48 hour dry-down all narrow the problem area before any excavation. Professionals add acoustic sensors and pressure gauges for the same reason. Digging should be the last step, aimed at a confirmed spot, not a search method.
Why is my water bill high when I don’t see any wet spots?
Because most irrigation piping sits below grade, water escaping a buried pipe leak drains sideways through soil and often never surfaces. The EPA’s WaterSense program notes that a leak roughly 1/32 inch across can waste about 6,300 gallons a month while staying invisible. Run the water meter leak test zone by zone; a dry lawn does not rule out a hidden irrigation leak.
Is a small irrigation leak worth fixing right away?
Usually yes, because the waste compounds every month. A fault losing 1 gallon per minute wastes 43,200 gallons over a 30-day month, which typically adds $50 to $200 to a bill depending on local rates. Simple parts run $5 to $25, so the repair often costs less than a single month of the leak. Rates and drought penalties vary by jurisdiction, so check with your water district.
Do smart water meters actually detect irrigation leaks, or just high usage?
They detect deviation from a learned baseline, which is more specific than raw usage. An inline flow meter records each zone’s normal flow rate, then alerts when flow runs high, which suggests a leak, or low, which suggests a constriction or valve fault. That shortens detection latency compared with periodic inspection. It does not locate the break, so the manual steps still apply.
When should you check your irrigation system for leaks?
Check at the start of the watering season, before heavy use begins. Freeze-thaw cycling over winter cracks components that fail the moment spring pressure returns, so a pre-season inspection catches the most common failure window. The cost surveys cited above put a professional pre-season inspection at $75 to $150. Re-check mid-season if a water bill rises without a change in schedule.